

Plant Propagation for Big Savings!
My yard is gigantic!
When we purchased our home 7 years ago, we had about two acres of lawn. Mowing the lawn is my all-time favorite chore (because the mower is so loud nobody can talk to me, so I get peace and not-exactly-quiet-but-just-as-good) but it took So. Much. Time every week.
Our sprinkler system needed more and more repairs every year, and it was so hard to keep it nice I just couldn’t help but want less lawn. So when it finally came time to completely replace the sprinkler system last year, I decided to to re-landscape the yard and eliminate about half of the lawn.
That meant adding a holy ton of garden beds and shrubs.We’re talking hundreds of plants, and I knew how much it was going to cost. As a certified frugalista, I reached into my bag of tricks.
I’d never propagated plants on this scale before, but I had dabbled, so I knew basically what to do. I drew a landscape plan and made a list of what I wanted in my yard.
I tallied up how much I needed of each plant and which plants I needed, and I started in my own yard. I had several burning bushes and I needed 18 more. 18 burning bushes at about $20 each would have cost $360.
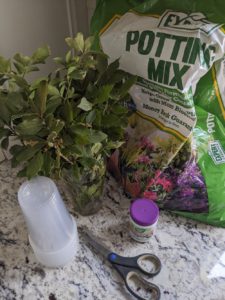
I just took 18 cuttings and planted them in potting soil, which cost me $4.54 for rooting hormone, $0.99 for a sleeve of plastic cups and I already potting soil. Plus it cost me about an hour to propagate the burning bushes and 15 pink rose bushes I propagated at the same time.
I saved about $735 on just the burning bushes and pink roses and spent about $6 and an hour. I feel like that’s a pretty great savings! I also propagated a bunch of hazelnuts, honeyberries and cold-hardy kiwi, which were pretty expensive specimens back when I bought them, along with lots of other shrubs and perennials that I already had.
There were a few plants I didn’t have, so I bought one of each of those, making sure to get specimens large enough for me to be able to take multiple cuttings without damaging them. I figure that I probably only spent a dollar or two per plant in the end because I was able to propagate each plant I purchased into 15-25 plants.
All in all, I propagated about 150 shrubs and perennials and I figure I saved over $3k. It was so simple that I’m planning to propagate a bunch of fruit trees for our orchards over the winter.
You can also take propagate all your favorite plants from around the neighborhood to enjoy in your own yard, as long as your neighbors don’t mind you trimming their plants a little. That’s how plant propagation can save you hundreds (or even thousands) of dollars.
Now lets talk about how to propagate plants!
How to propagate plants:
One of the most amazing things about plants is that every cell has the ability to duplicate all parts and functions of the plant. By taking cuttings and creating the right conditions, you can create entirely new, independent plants from what you’ve already got.
There are numerous plant propagation methods, but I’m just going to tell you about my favorites. In addition to being cheap, I’m also kind of lazy, haha. So I tend to use the easiest, quickest plant propagation methods. Not all methods work for all types of plants, though, so keep that in mind.
Softwood Cuttings Propagation Method
This plant propagation method works great for woody shrubs as well as houseplants, and is quick and simple. This is my favorite method to use for almost all plants besides bulbs and perennials.
Choose a healthy stem near the tip of the plant, so it’s of newer growth and not woody. Cut a 4″ to 6″ long stem at a 45 degree angle to maximize the surface area of the cut for maximum rooting. I tend to propagate in large batches, so I just carry a glass of water around and snip cuttings with a pair of scissors then plop them in my water glass.
Remove all but the top set of leaves, then use a clean, sharp knife to scratch the outer layer of the portion of the stem that will be inserted into the potting mix and dip the cut/scratched end into water and then the rooting hormone.
You can purchase the rooting hormone as a powder or a liquid. It helps by sealing the cut plant tissue, promoting new growth, and it also contains a fungicide to protect against rotting.
Scratching the outer layer of the stem (particularly if you’re propagating a woody shrub) helps the stem to root well. Poke a small hole in the potting soil before inserting the cutting, in order to avoid rubbing the rooting hormone off the stem.
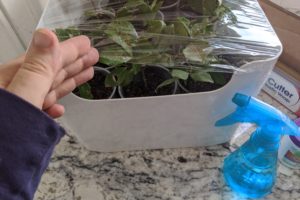
Cover your new cuttings with plastic wrap, or if you just have one or two, place them in a clear, plastic blag. The plants will benefit from the additional humidity and warmth this little greenhouse will provide. Keep them in a warm, brightly lit place, but out of direct sunlight, because you don’t want to overheat them.
Use a spray bottle to mist them often and keep the humidity high in your mini-greenhouse. You merely want to keep the potting soil moist, not wet, because mold and fungus can kill small cuttings quickly.
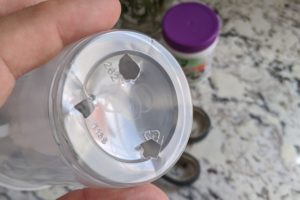
Once the cuttings have developed roots, replant them in a larger container with moist (not wet) potting soil. If you use clear plastic cups to plant your cuttings, you’ll be able to see the roots around the edges. If your container is opaque, you may be able to see roots growing out the drainage holes.
Another way to tell if your plants have rooted is by giving them a gentle tug. If they pull right out of the soil, they have not rooted sufficiently. Roots will keep them pretty firmly planted.
It can take a few weeks or more for your cuttings to become fully established, depending on temperature, light and other growing conditions. I keep mine in a shady spot on my front porch, which only receives a small amount of morning sun.
It’s around 80-90 degrees midday, and it usually takes about 3 weeks for my shrub cuttings to become fully established. Where I live (Utah, USA), softwood cuttings like this only work during the summer, while the plant is actively growing.
Until the new plants have become fully established, carefully monitor the amount of moisture and light they get. Mist them several times a day to keep humidity high. I always leave a small uncovered area, or turn back a corner of the plastic wrap so as not to overheat my little “greenhouse”. You can see that in the pictures here.
And here is a short video of this plant propagation process:
Hardwood Cuttings Method
This method is ideal for trees, including fruit trees. Hardwood cutting are taken in the dormant season (mid-autumn until late winter) after leaf fall, avoiding periods of severe frost. The ideal time is just after leaf fall or just before bud-burst in spring.
Select vigorous healthy shoots that have grown in the current year and remove the soft tip growth. Cut straight across at the base below a bud or pair of buds and dip the lower cut end in your rooting hormone.
Prepare a trench outdoors in a sheltered site with well-drained, rich, loamy soil. If you have clay soil or drainage issues, add a layer of sand in the base of the trench right below the level where your cuttings will rest. Insert the cuttings into the ground with two-thirds of the cutting below the surface.
Let cuttings grow at least a year, ensuring that they don’t dry out during dry periods. Once fully established, they are ready to transplant into their intended destinations.
The length of time these take to grow is why I typically just use the new-growth tips and follow the softwood cuttings method. But this one is great if you want to propagate massive amounts of trees in an easy, low-maintenance way and don’t mind waiting a year.
Propagate Plants Using Leaf Cuttings
Most indoor houseplants and some woody plants can be propagated from leaf cuttings. Select a healthy, full grown leaf from a vigorously growing plant and remove it along with at least 1.5 inches of its stem.
Dip the cut portion in rooting hormone and plant the entire stem (up to the bottom of the leaf) at an angle in moist (not wet) potting soil. After planting water thoroughly to settle the potting mix around the plant.
As with the other cutting techniques, place the container in a plastic bag to increase humidity and keep it in a warm place out of direct sunlight. It takes 4-6 weeks for new roots will form. At this point, you can transplant the cutting into a larger container to grow larger before planting outside.
Propagate Fruit Trees From Suckers
Do you get irritated at all the little suckers that grow unbidden around the bases of your plants? I used to, but since I learned this trick I welcome them.
Spring is the best time to propagate using suckers, because plants are just beginning to grow actively and the severed suckers will establish themselves quickly. Loosen the soil around the sucker and carefully expose and lift the sucker with its roots, being careful not to disturb the parent tree.
Using clean pruning tools, sever the sucker from the tree, making sure the portion you are removing has plenty of roots. Replace the soil around the parent tree.
Trim the top of the sucker (the portion that grew out of the ground) to about half and remove any side shoots. Trim off all leaves but one to reduce transpiration.
Plant the sucker into rich, loamy, well-drained soil, then firm the soil around the roots and water well. Ensure careful watering that first season, making sure the soil never dries out completely.
Fruit trees are often grown on different rootstock. All that means is that the grower has cut the roots off a fruit tree and grafted a hardier or dwarfing rootstock onto the tree. So if a sucker comes from a grafted rootstock, it probably won’t grow any fruit. If the sucker is from a non-grafted root, it will be fine.
Root Layering Method of Plant Propagation
This method works great for pliable shrubs and is easy to set and forget. It works best any time the shrub is actively growing, or during early spring when the plant still looks dormant but is ready to begin growing.
Choose a flexible, low-growing branch and bend it to the ground. Where the branch would hit the ground, use a pair of clean shears or a knife to scrape the bark on its underside, where it will contact the dirt. Remove any leaves and branches from the portion that will be buried. Place that area in a small hole, a couple of inches deep and cover it with soil. You may need to place a rock on top of the soil to hold the branch firmly underground. The tip of the branch should be left out of the soil and staked upright to keep it growing straight.
Keep the layered area moist and free of weeds and within a year roots will have developed. Cut the new plant from the parent plant and transplant it to the desired location.
Tip Layering Propagation Method
This plant propagation method mainly works for blackberries and raspberries. I’ve never see it used on any other plants. It is similar to the root layering method explained above, but it’s even easier!
You just bend a berry cane over, tuck the tip into the dirt and bury it good so it will stay. A new plant will miraculously grow upward, and then you can snip the original cane and have double the berries.
Plant Propagation by Root Division
This is my preferred method for dividing perennials. It’s amazingly easy, it keeps your plants healthy (they lose vigor when they get too large) and you get extra plants for free.
Perennials can be divided anytime from spring to fall, but the plants may not flower if they haven’t had time to establish themselves. So if you want them to flower, divide spring-flowering perennials in the fall and fall-flowering perennials in the spring.
Carefully cut the plant into two or three pieces with your shovel blade. Gently dig up the portions you are transplanting and pull them out of the ground. Make sure each piece has enough root mass to sustain it.
Rhizomes may need to be lifted before dividing so as to be able to cut the roots apart with a sharp knife. Plant the divisions just as you would any other plant, but provide extra water and nourishment as they get established.
Bulb Propagating
Bulbs are another plant variety that lose vigor as they reproduce and grow. They benefit from division. All you have to do is gently dig up bulbs that have flowered during the spring and separate clumps of bulbs into separate bulbs.
Replant the baby bulbs in a new location, using the same method with which you originally planted them. I like to wait to dig them up until the foliage has died back, giving the bulbs the maximum amount of time to replenish nutrient stores for subsequent growing seasons.
>>> Here are lots more ways gardening can save you big money! <<<
Plant Propagation Tips:
Clean the blades of your pruning tools with rubbing alchohol to prevent transmitting diseases from infected plants to healthy ones.
Be sure to take more cuttings than you think you’ll need, as they likely will not all root.
Because soft stem cuttings are taken from young plant tissue they form roots relatively quickly. However, they require high humidity levels to keep from drying out.
Pin these methods of plant propagation for later!
What’s your favorite method for plant propagation? Please share in the comments below!


Thanks for sharing this blog with us.